Google Drive Clean-up

Google Drive Clean-up

#5 Educators implement effective practices in areas of planning, instruction, assessment, evaluation and reporting.
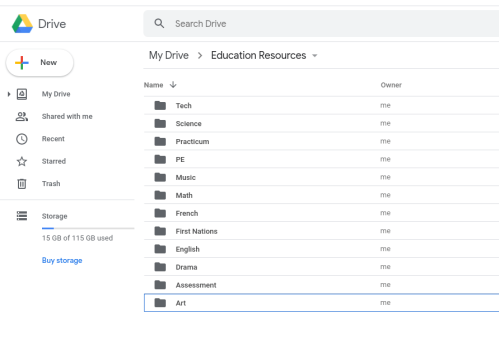
I re-organized my Google Drive of all my teaching tools and created a space where I can easily find my appropriate resources organized into each subject, with additional folders for Assessment and FPPL.  I wanted to have easily accessible online resources, so instead of having large binders and piles of papers scattered throughout my future classroom, I can just hit print on whichever worksheet is needed.

As part of my growth, I have been downloading and saving the resources from Coursespaces which my professors have been posting. An overall teaching goal is to accumulate so many online resources through my peers and professors, that I will be over-equipped going into my final practicum.  Thanks to this project, I feel much more prepared to tackle my practicums and eventual career.

Below is an example what my google drive looks like currently in my Teaching Resource Folder:

Screenshot 2020-04-01 at 22.46.21

Lastly, a part of my goal was to scan in all of the important paper resources that my teachers have given me this year. I had planned on this before the COVID-19 ordeal began but after I moved out of my house, I left that all behind sadly.  As well, I do not have access to a scanner at my current address. Therefore, I would have had to find a bulk scanner either on campus or at Staples and sadly that won’t be happening any time soon. I still believe that my systems of organization will be finalized when I am officially a teacher and I will have every opportunity to explore each option. Right now, it is more of a guessing game and I can only share what I believe will be the most effective for me.

Overall though, thank you very much Diana for the semester. I hope you doing well and staying safe. All the best.

Pioneers and Adventurers

Pioneers and Adventurers

Pioneers and Adventurers

(Sample Document)

The Dice Based, Oregon Trail Role Playing Game

Designed by:

Michael McTaggart and Ryan Kaye

Illustrated by:

Eliza Kerridge


A 10 week teaching resource that effectively teaches how difficult the original settlers of North America explored and began a new life. Students are placed into settlement groups of 4 or 5 and are asked to begin their trek across North America. They will have to Hunt, Explore, Trade and Co-operate along the Oregon Trail if they wish to arrive safely on the West Coast!
If the Oregon Trail is not apart of your curriculum, then other pioneering adventures can easily be applied to our format. Soon to be released is the Canadian Fur Trade and the West Coast Gold Rush. Stay Tuned!

Subjects covered:

Social Studies, Math, Language Arts, Art, Physical and Health Education, Science

Game Play:

Lesson 1 (45 min):

  • Teacher sets narrative with a story giving context (yr 1840)
  • Form groups – teacher choice
  • Groups chose characters – make up of party
  • Write character building questions
  • Colour characters and wagon for travel line.

Lesson 2 (30-45 min)

Rules:

Will be handed out to be a quick ref guide to glued in second page of Journal.

  • Respect the Game. Cheating makes the game fun for no one.
  • It is not a race against others.
  • We all survive together. Be respectful to your group and other groups you interact with.
  • Success and learning doesn’t always come by surviving.
  • Only 2 groups at a time per table.
  • If a 3rd group shows up, they will be sent to the Event Table.
  • If a character dies, their group creates a headstone to be left on the travel line and the player becomes the teacher’s helper.
  • Either by helping out at a table (banker) or becoming an Observer of History.
  • Once there are 4 characters who have died, they may reform into a new group and start upon the trail again.
  • Food only needs to be consumed while you are travelling.

Pre-Trip Planning (Day 0):

  • Acquire money based on character class.
  • Purchase Items at the store.
  • Do not exceed weight limit of the cart.

Lesson 3 (45 min): 

  • Write characters backstory (for journalers) or write first letter home

Groups hit the road!

  • Extend length of time for each in game time.
  • 3 (in game) days in, write the first Letter Home or Journal entry!

Every Round ends with the teacher calling for the end of in game day (aim for 5-7 min, give 2min warning to end of each day). No further rolls allowed, Students given 2-3 min debrief and planning session break between in game days. If this ends a 4(ish) day period, Students are given time to journal “on the trail” experience.

Lesson 4 and on (45 min):

  • Groups continue on the road!
  • Journal or Letter home happens at regular intervals.

When the game ends:

Session 20 (10 weeks twice a week)


Assessment:

Assessment options are listed below. We recommend at least using the journal.

  • Journal or Letter home
  • (every 7 game days) what does family need to know, highlights of week
  • Tableau – showing what’s going on in their group at given points in time
  • Written solutions to catastrophes or how your group solved a problem
  • Celebration to share experience with other class or group
  • Oral presentation
  • Envelope with 3 ideas of survival at ¾ of the way through
  • Tips and tricks/What works what doesn’t
  • Write a newspaper article about how to survive the Oregon Trail

Game Play and Table Resources:

Notes for the Teacher:

  • You control who goes to the Events table.
    • This is not to be used as punishment.
  • Only two groups are allowed at any table. If a third group shows up to a table, send them to the events table.
  • Only send one group per day to the events table (up to your discretion).
  • River conditions:
    • Teacher can pre-plan these for the number of days that pass in any given session, or the numbers can stay stagnant through multiple sessions.
  • Teachers must observe groups cart weight limits. Impose breakage penalties for overweight.
  • Students whose characters die or students who are resistant to playing my help out by being a banker at the trading table, or by being an Observer of History and journaling what happenings they observe.
  • There is a bit of classroom prep in setting up the landmarks and river crossings in your classroom. We have tried to make the distances between each landmark a bit easier to place as each classroom size will be different.
  • Distances have been rounded slightly.

Classroom Setup:

Around the room there will 6 activity stations, each with a unique encounter for every group. Students allow each group to rotate around


Example of the Hunting Activity:

Organizing Teaching Materials

Organizing Teaching Materials

Teaching Competency:

#5 Educators implement effective practices in areas of planning, instruction, assessment, evaluation and reporting.

Over the course of three months I spent some time cleaning off my desk and re-organzing all of my teaching materials that I had accumulated over the years. I had no idea how large this task would become and was only able to stratch the surface before the COVID-19 ordeal occured.  I was able to clean my desk and remove any unwanted papers or clutter.  I had wanted to spend time placing all of my papers into binders and preparing binders with every subject for future teaching. Sadly, I moved out of my house into quarantine and won’t be able to follow through on that until after this ordeal is finished.

Below was the before photo of my desk:

And here was after:


As one can observe, I was able to clean the desk but unable to organize each subject into binders. I know I would have to have them completed by the time I start a practicum.  This will give me some busy work over the summer when I come out of isolation.

Lasly, I found this has began my process to become fully prepared and organized to teach full time in the classroom. I find it has been a large part of my teacher growth within this competency in regards to my organization.

Assessment Planning

Assessment Planning

#5  Educators implement effective practices in areas of planning, instruction, assessment, evaluation and reporting.

#3 Educators understand and apply knowledge of student growth and development.

As a part of my Teacher Growth, I have been planning my Assessement that I would use on any future practicums and within my own teaching. I have explored mulitple options that have been presented to me over the past two years, throughout my practicums and Pams assessment class. The two that I have enjoyed the most have been a personal Excel spread sheet that I designed myself and Friday folders that were introduced by my wonderful assessment professor.  Both systems allow me to personalize the feedback I want to give to the students, while being able to stay organized.

I spent a large portion of time designing a “feedback organizer”, where I would have each child alphabetically slotted into a “row” in my organizer and then in the columns I would have a variety of different subjects. I have included catergories besides the common subjects, such as adaptations, modifications and “awesome things they have done”. This way I can keep track of things beyond just basic subjects and will help me equally observe all of my students. Below I have provided a link to my google sheets for anyone to share.

https://docs.google.com/spreadsheets/d/1VZI1_xmaUwYbvvyZLL4sL2GDEHNgvArpF6D0aZHk9Fw/edit?usp=sharing

Additionally, it allows me to create duplicate sheets for every grade and/or new classroom that I start, letting me keep all my assessment in one organized file.  Plus by having the portability, it lets me have access to it at any point, including while on field trips or own in the school yard.  This is an incrdidlbe tool that I am very excited to use on future practicums.

With regards to Friday folders, I am very excited to share this with my future practicums. The crux of this assessment tool, is to bring students into assessment process. Every Friday, students will be asked to place something they are proud of into their “Friday Folder”.  Over the weekend, I look through their friday folder and write them a quick few sentences on why their work is awesome. I then get to write a unique, yet specific word relating to their work on top of their folder. Words like “sophisticated, extraordinary and resourceful” that each student will have to look up and learn! Every Monday, the students are chomping at the bit to read their notes and see what new word was written about them. It’s an easy way to have them send their best work to you and it is also a sneaky way for them to learn new vocabulary.

Combined, these two systems will speed up my marking and prevent me from getting overwhelmed during report card season.


Ed Tech – Coding and Distributed Learning

Ed Tech – Coding and Distributed Learning

Throughout the year, we have been discussing why students with a variety of disabilities should be included in the classroom but rarely are we offered proper examples of how to include the students. I learned that through multimedia theory and personal learning networks, teachers are able to create learning environments that fit the students and their needs.  If a teacher is able to use a variety of Multimedia principles, students can learn through auditory and visuals channels that suit their system of learning. I wish my professors from first year who would read the textbook/slides could take notes on Multimedia theory.  Another unique way for students to learn in the classroom is through the usage of robots and the idea of distributed learning. I had the wonderful opportunity to learn and play with a Beam robot ($5000 machine) today. It is a remote control robot that can be controlled through a laptop or phone app and has a two way audio and visual display. The application of this endless for students who are injured or unable to make it to class, they now can use a robot to connect with the material in any classroom (if its wheelchair accessible). While this is the extreme end of blended learning, the usage of distributed learning should be more widely accepted and utilized in a modern classroom.

Lastly, I was able to play around with the basics of coding, through a program called Scratch. It is virtually an advanced version of the powerpoint movies that I used to make as a child. With a simplistic interface, students can create a personalized story that allows for creativity and critical thinking. I would recommend that this program be used in grade 3 classroom’s and up but only for simple tasks. If students are given the basics of Scratch early in the year, then a teacher could easily offer this medium as way for them to complete a large project.  I most likely will be using this in my classrooms for a variety of cross curricular applications.

Tech Inquiry #5 – Layering

Tech Inquiry #5 – Layering

My experience working with layers today explored a whole a new level of photoshopping. I started off with the tutorial provided by photoshop and I learned how to add layers through shading. I found it difficult to follow the many different steps they provided but was able to complete the overall task. I doubt I will be using this system in the future for my photography but I’m glad I got some exposure.  Below was my final copy of the tutorial:

After I completed this, I explored how to put in images into my own photography and I had a blast. I decided to choose a photo of my friend while he was taking pictures of big horned sheep in the Rocky Mountains.  I decided to add in a different surprise using layering and colouring. See if you can spot my creation:

I used the magnetic lasso tool to on the different sheep by creating a separate layer.  I then hid my dinosaur friend behind the layer of the sheep, so it looked more natural. Additionally, I used the eyedropper tool to take the colouring of the sheep and applied it to my dinosaur.  Overall, I had tons of fun playing around with my photos and I can’t wait to get my own copy of photoshop.

Open Inquiry #5 – Self Publishing Vs A Publishing Company

Open Inquiry #5 – Self Publishing Vs A Publishing Company

Before I even started this endeavour, I believed that publishing was a simple process.  Where you write out a story, send it into a few publishers and then BOOM you’re seeing your work at the local bookstore.  NOPE, I was very very wrong.  There are many things to be aware of such as royalties, illustration privileges and the cost of publishing.  I have been researching the difference between going to a publishing company and self publishing my own work.  Both have its pros and cons but for me the cons usually end up being about money.

When looking into several large publishing companies, I discovered that they would edit, illustrate, copy right and publish the book for a smaller portion of royalties.  While this is great, getting your foot in the door and having your manuscript read by an editor seems like an near impossible task. Every website sounds like they receive thousands and thousands of scripts each week and yours will be just added to pile. If I wanted to send my work into a publisher, I would need to make a cover letter, a mini bio and send in only the manuscript with no artwork. They want the story to be told through only the words. Their philosophy is that if you need the artwork to help tell your story, then the words are not enough.  I believe that my work will be enhanced by the artwork but does pretty well on its own.

If I wanted to go the self publishing route, I would need a much larger bank account starting off but would see a much greater return in profits. Self publishing companies require you to put large amounts of money forward, commissioning them to create the artwork and publish the book.  They offer packages of services or you can individually purchase the services. If I had the money and the confidence, I would be going this route because you can make 90% of the royalties once your book is in bookstores.  The only issue that I had with this system, is that they offered ALOT of extra services, that seemed a little underhanded. If you paid for the most expensive package, then they promoted your book with large banners on their website. Which basically means it doesn’t matter how good your book is, its all about whomever paid more money to plaster their book everywhere. This made me feel very uneasy about sending my book to them. If in the future I decide to go down this route, I’m going to be finding friends to help me with the Illustrating and Marketing. Only using a self-publishing company to print the book.

Overall, since I am still in university, I do not have the funds nor the time to self publish. Therefore, I am putting all my effort into local publishing companies that can support West Coast authors, especially one that is becoming a teacher.  I have one Victoria publisher that I am most excited about sending my manuscript to but the only frustration is that their Editor (who reads the send in manuscript) recently left on maternity leave. My current conundrum is whether or not I should wait until she gets back. This decision will have to wait once all my classes are completed in just a few days.

Open Inquiry #4 – Edited Story

Open Inquiry #4 – Edited Story

Over the past few weeks, I have been sharing “I Don’t Want To Be Scared” with family and teachers, slowly gaining constructive criticism. I discovered several things that need to be addressed in my story and I have spent the rest of my time correcting them.

When I shared this story with my brother, he gave me plenty of criticism (which he always does). Firstly, he offered a better name for the titular character, Happy. He asked “If all the trees in this story have alliteration in their names, why doesn’t the main character? Shouldn’t his name be Happy, The Hemlock? Keeping with the West Coast Tree theme?”.  I can’t believe that i never thought of that. It was a brilliant idea and I have since changed the name. In addition, I switched Happy’s ending “idea” from being an acorn to being a pine cone which then rolls away.  This in my opinion has dramatically made the story more west coast appropriate and scientifically accurate.

After I showed my teachers the story, they also had great ideas to suggest.  One explained that I should be careful about the distinction between Scary and Haunted. If my characters want to be haunted, does that imply there are ghosts in the forest? If so, how do the trees attract the ghosts? It raised to many questions and I have since edited out the unnecessary “haunted” words.  As well, I had simple convention errors that were fixed by my teacher, which were quite helpful.  A separate teacher who knew more about publishing, reconfirmed my suspicions about which publishers I should focus on.

Since I have a final copy now, I am going to be applying to some local west coast publishers and I shall be exploring the differences between Self Publishing and finding a Publishing Company.

Cheers,

M

Music – Lesson Reflection and FPPL

Music – Lesson Reflection and FPPL

My experiences teaching a music lesson to the rest of the class was definitely a unique learning opportunity. Looking back on it, I realized that I never “taught” as much as I would have liked. I did find, I walked around the classroom and offered lots of one on one advice.  Each person in our group took on teaching a different portion of our project, and I found that teaching Dynamics was fairly straightforward.  My only reluctance was that I was teaching it to college students and had no idea if they understood what I was teaching, let alone care about it.  I feel as if I was in front of a classroom of grade 3’s, I would have spent much longer on my portion of the lesson. I did feel badly when the next group went up after us and produced two beautifully done posters on both Tempo and Dynamics.  They dived much deeper into the many different kinds Dynamics and Tempos but I believe they were doing it for an older age group than us.  If I was to teach that again, I would work on our classroom management skills and spend more time exploring the different tempos and dynamics used in each groups “emotions”. I think this experience would be drastically changed if we had been teaching to elementary students and not our peers. 

In regards to the First Peoples Principle of Learning (FPPL), I have come to the conclusion that these ideas have already been applied into the BC curriculum under the guise of different writing.  Whether that be “Learning involves recognizing the consequences of one’s actions.”  or “Learning is embedded in memory, history, and story”, these ideas are the core competencies just phrased differently. While I understand that these are not identical and are intended to be unique, I can’t help but draw the parallels from the BC curriculum.  Of course the primary concern that I have had with the FPPL is the principle of “Learning ultimately supports the well-being of the self,
the family, the community, the land, the spirits, and the ancestors”. While I support all of these things being taught in schools, I have an important distinction that should be made. In regards to spirits and ancestors, are we teaching the students ABOUT spirits or are we teaching spirit TO the students? From one of the examples that we were provided about how the FPPL could be applied in the classroom, it states “Seek understanding of a worldview that does not separate the physical and spiritual worlds”.  If this means to understand how the First People view the world around them, fantastic! If this means to explore this as a philosophical view point, then we are going to have conflicting view points. I do believe it is the first option and people have been misconstruing the wording of the FPPL.

Overall, the concepts presented through the FPPL are extremely important to discuss and should be applied in the classroom. We need to create a greater focus on learning about our own nation’s cultures, especially the First Peoples. On the flip side, we need to be aware of the distinction between teaching ABOUT a culture and teaching THE culture to students.  

Ed Tech #6 – Minecraft and Gaming

Ed Tech #6 – Minecraft and Gaming

One of the biggest fears a first time teacher will have, is “Can I keep my student’s attention?”. Well look no further and the modern era of video games, specifically Minecraft. I had the privilege of exploring Minecraft’s Educational experience and I am very impressed. My comprehension of Minecraft began when it first came out and I put it off as being another simple building game.  I had no idea that Minecraft was continually updating and turning itself into an advanced survival game. It creates endless opportunities for students to explore a variety of subjects such as Math, Social Studies and Art.  I also found that students can explore moral choices through interaction with their peers and the surrounding environment. It really is a 8-bit real life simulator, where students have the ability to foster their own curiosities in a challenging environment. Additionally, I appreciate how our instructor would create equal opportunity for both computer lab time and outdoor time on the same day.  It’s incredibly important to create a balanced classroom for a wide variety of students who all have different learning needs.